I posted this fix for everyone who is struggling with connecting their DiskStation to their media players when they are not in the same VLAN. I can now play my movies, listen to music and see my photos. I had to piece together this fix and with the help of a few people from other forums all of the pieces came together and resulted in this procedure. If you’re like me it gets tiring chasing down possible leads and almost finding the answer. On more than one occasion a thread on a formum ends with the person finally figuring it out but they don’t take the time to tell everyone what they did.
Recently I set up a VLAN network. There is suspiciously little information on getting services to work between devices on different VLANS. There is however lots of information on how to set one up in the first place. Below is my attempt to help others who have set up a VLAN and who have seperated their media devices from thier DiskStation. I make no guarantees. This procedure works for me. At the very least it is a blueprint of what basic things need to be done. I invite you all to make CONSTRUCTIVE comments to improve these instructions. I hope this inspires others to upload detailed instructions on how to get services to work in a VLAN setup. Enjoy!
Getting Your Media Devices Connected to your Diskstation
while they are Connected to Different VLANs
Implementing these instructions are done in 3 parts. When you are done you should be able to view your media and have normal access to your DiskStation(s). The firewall is designed to be very granular and will require modifications as you add new capabilities to your NAS. Some notes before you begin:
- These instructions are for DiskStations (DS) that have at least two LAN interface ports. If you have an older DS with only one ethernet port, you’re out of luck. As far as I know, it can’t be done, but if anyone has done it please chime in.
- These instructions assume that you have an operational VLAN setup in place and your DiskStaion is on a different VLAN from you media devices.
- If you do this fix you will need to remember to update your LAN 1 firewall every time you introduce a new service to your DS. For example, if you add OpenVPN, Mail Server, DNS Server, off-site Active Backup for Business connections, etc. As your new services need new ports opened you will need to give these ports permission to pass through the LAN 1 interface firewall.
- These instructions assume that you will be using your LAN 1 interface to connected to your secured VLAN (ex. Primary VLAN) and LAN 2 to connect to you unsecured VLAN referred to here as the IoT.
- Have a list of all your VLAN subnet addresses, device IPs and a list of your current services (and their ports). You can find a list of ports used by each Synology service on their website here.
Part 1. Connect your LAN 2 port to a VLAN other than the one that LAN 1 is using.
-
Power down your NAS and then connect the LAN 2 interface to a port that is connected to the same subnet as your media devices are connected to (your IoT subnet)
-
Power up your NAS.
-
On your DS go to Control Panel > Network > Network Interface to verify that LAN 2 is connected to your IoT subnet.You should see an IoT DHCP IP address that is different from the LAN 1 address.
Part 2. Next, configure your firewall profile into two sets of rules to prevent backdoor attacks into your NAS through your “less secure” IoT network. WARNING, you will need to maintain these firewall settings as you add or change services to your DS. This part of the instructions is the most tedious part.
-
Go to Control Panel > Security > Firewall.
-
You will see the default profile in the drop down box. Click Edit Rules and if there are any rules already there you need to copy exactly what each rule is. Just click once on a rule, click edit and write down all of the settings. Do not delete or disable any of the rules.
-
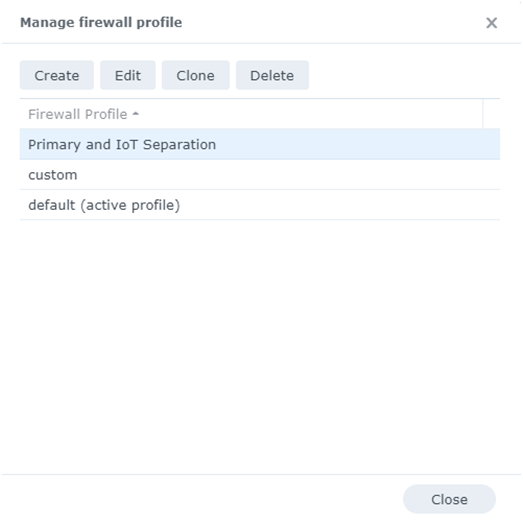
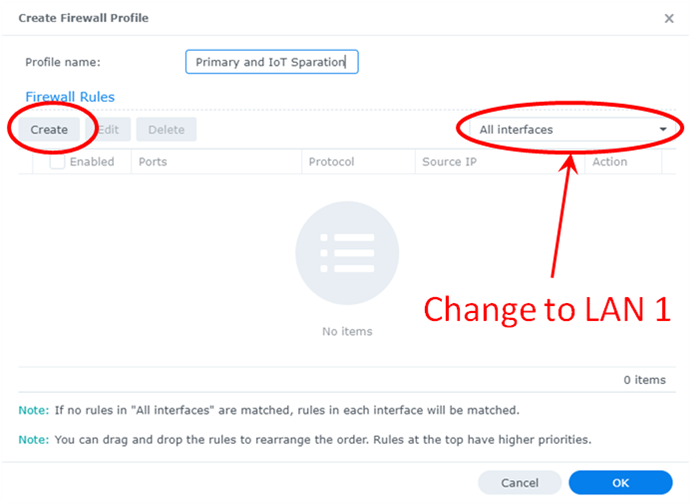
When done click Cancel to exit out of the default profile. Then click the drop down arrow and select Manage Firewall Profiles. Click Create and give your new profile a name like “Primary and IoT Separation.”
-
Change the drop down box from All interfaces to LAN 1.
-
Click Create. You will create a rule for each VLAN subnet in your network (not including your Guest subnet).
-
You will get a new pop-up window.
-
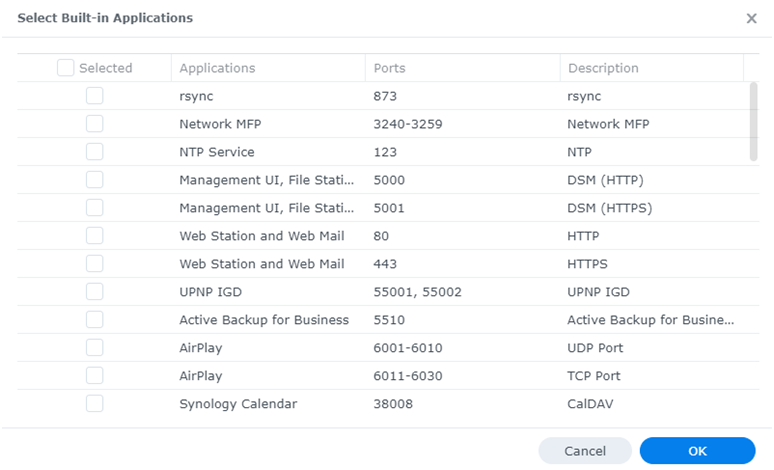
In the new pop-up under Ports click Select from a list of built-in applications.
-
You will need to select the port services that your DS is currently using (ex. Active Backup for Business, Video Station, Download Station, hybrid share, hyperbackup vault, Windows File Server, etc., etc.). Some of these services are quite granular and will require you check several boxes to keep the service running. For example, if you use Download Station you will need to check the boxes labeled BT and eMule as both are part of Download Station. Refer to the list you previously made in your notes above and also add the below list of essential and “likely to need” services**. Use your discretion here. Do not just check “Selected” to allow all applications through**. DOING THIS WILL EFFECTIVELY DISABLE YOUR FIREWALL.


| Application | Port(s) | Application | Port(s) |
|---|---|---|---|
| Management UI | 5000 | WS-Discovery | 5357 |
| Management UI | 5001 | WS-Discovery | 3702 |
| UPNP IGD | 55001,55002 | Advanced LUN Replication | 3261 |
| Web Station Web Mail | 80 | Windows ODX | 3263 |
| Web Station Web Mail | 443 | Virtual Machine Manager Remote Storage | 3264 |
| Active Backup for Business | 5510 | Video Station | 9025-9040 |
| AirPlay | 6001-6010 | Video Station | 5002,5004,65001, 5002,5004, 65002 (source port) |
| AirPlay | 6011-6030 | Virtual Machine Manager | 2379-2382,2385, 16509,16514, 30200-30299, 30300 |
| Hybrid Share | 26500-27000 | Bonjour | 5353 |
| Hyperbackup Vault | 6281 | SNMP Service | 161 |
| DLNA/UPnP | 50001,50002 | Share Files with MAC | 548 |
| DLNA/UPnP | 1900 | MAC/Linux File Server | 111,662,892,2049, 4045 |
| Share Snapshot Replication | 5566 | Synology Assistant Network Backup | 1234,9997,9998, 9999 |
| Windows File Server | 137,138,139,445, 137,138 (source port) | UPS Server | 3493 |
-
Click OK to save your list of ports permitted through the firewall.
-
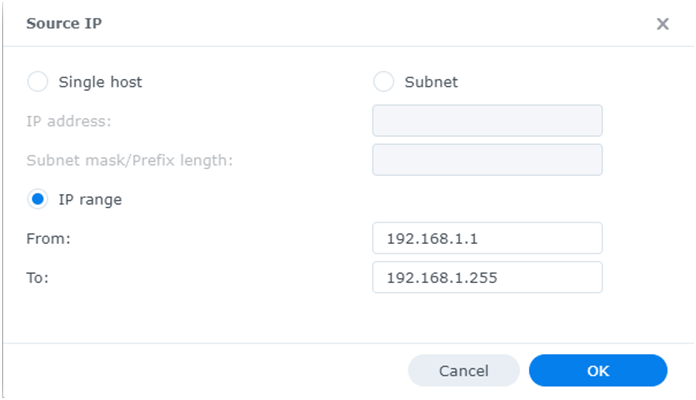
Under Source IP click Specific IP and then click IP Range. Type in the range of your first VLAN subnet.
-
Click OK and then make sure the Action is set to Allow. Your will repeat steps 5 thru 11 for each VLAN subnet you have
-
Make sure the If no rules are matched: is set to Deny Access.
Note: If you set this to Allow Access the LAN 1 rules will become meaningless because you will be letting all traffic through anyway. After you complete this whole setup and you are finding that services are not working right, you can set LAN 1 to Allow Access to temporarily keep things working until you fix the errors.
Note 2: If you have a remote computer accessing your NAS you will need to add other rules for each remote computer and for each service that is being used by each computer. For example:
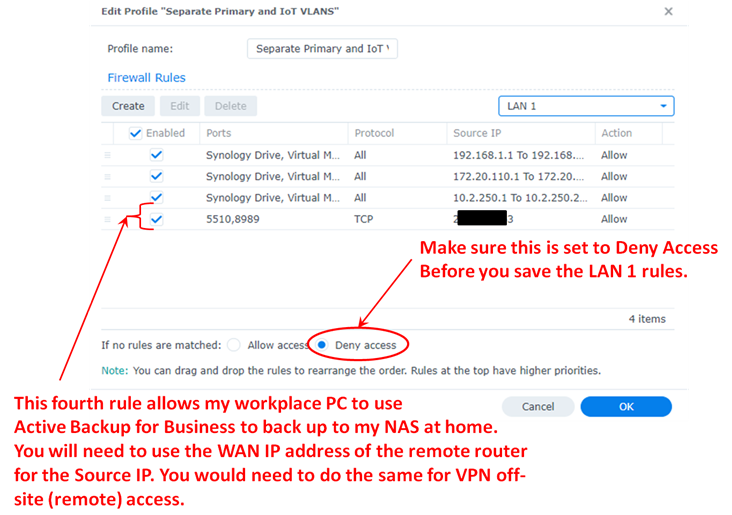
Note 3: If you have a VPN setup to a remote computer you need to add a rule that refers to the VPN service and not the remote router IP like you see for ABB (above). This is because the remote router does not directly connect to your NAS but connects through a DDNS service instead. Therefore your NAS firewall must allow the DDNS services through. By enabling VPN Service this allow the DDNS to connect to your NAS. The rule should look like this.
-
Now change the drop down box to LAN 2. You will be creating a set of rules for each media device you want to access your NAS.
-
Each media device will get four rules. These instructions will walk you through the setup for the first device. You will need to repeat the process for the other media devices you have.
-
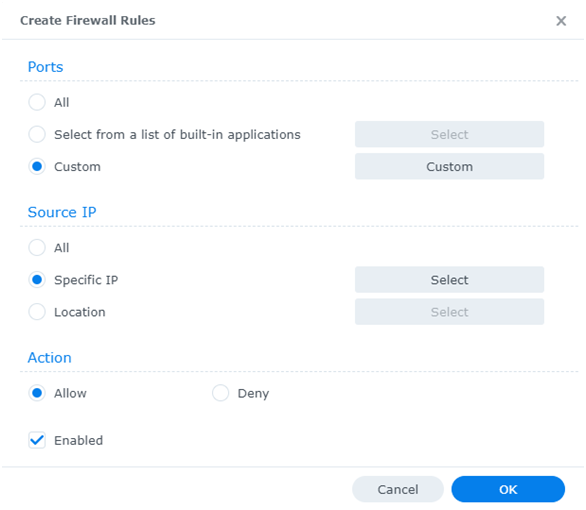
Click Create and in the Create Firewall Rules set Ports to Custom.
-
Click the Custom button.
-
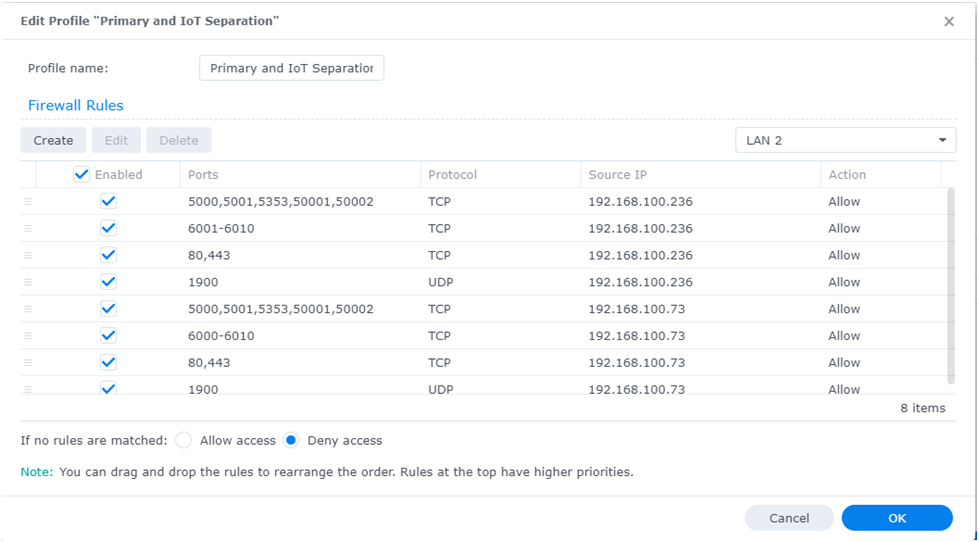
Set Type to Destination Port. For the Protocol select TCP. Then select Ports (Separate with commas.) and add the ports for your rule. For this first rule add the following ports: 5000,5001,5353,50001,50002 . Click OK.

-
In Create Firewall Rules under Source IP>Specific IP click the Select button and in Single Host type in the IP address of your media device. Click OK.

-
Make sure that Allow is selected in the Create Firewall Rules popup and then click OK.
-
Second firewall rule: Click Create again and in the Create Firewall Rules set Ports to Custom.
-
Click the Custom button.
-
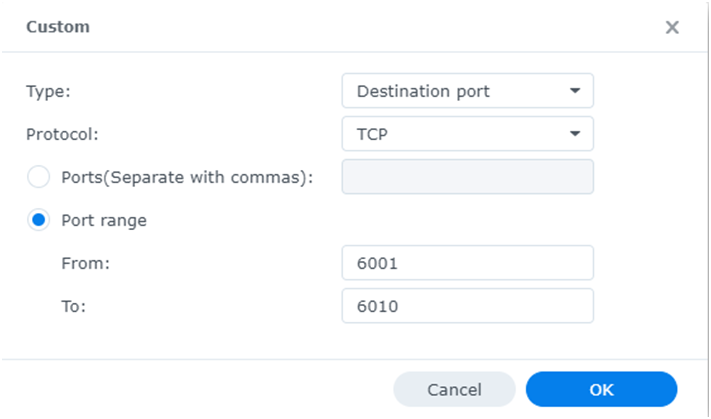
Set Type to Destination Port. For the Protocol select TCP. Then select Ports Range and add the ports for your rule. For this second rule add the following port range: 6001-6010 . Click OK.
-
In Create Firewall Rules under Source IP>Specific IP type in the IP address of your same media device again.
-
Make sure that Allow is selected in the Create Firewall Rules popup and then click OK.
-
Third firewall rule: Click Create again and in the Create Firewall Rules set Ports to Custom.
-
Click the Custom button.
-
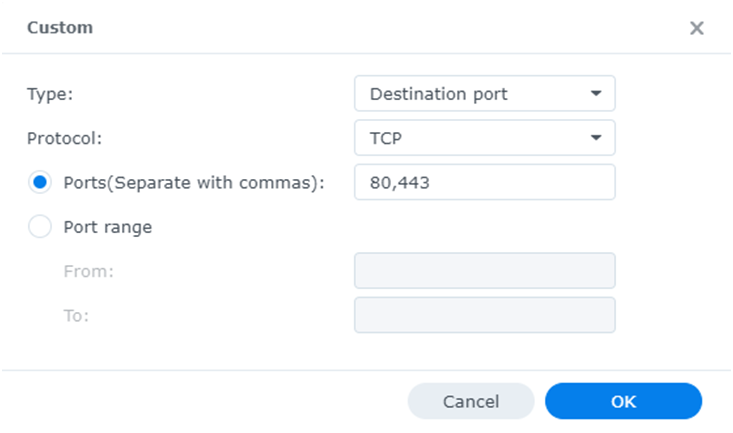
Set Type to Destination Port. For the Protocol select TCP. Then select Ports (Separate with commas.) and add the ports for your rule. For this third rule add the following ports: 80,443 . Click OK.
-
In Create Firewall Rules under Source IP >Specific IP type in the IP address of that same media device again
-
Make sure that Allow is selected in the Create Firewall Rules popup and then click OK.
-
Fourth firewall rule: Click Create again and in the Create Firewall Rules set Ports to Custom.
-
Click the Custom button.
-
Set Type to Destination Port. For the Protocol select UDP. Then select Ports (Separate with commas.) and add the ports for your rule. For this fourth rule add the port: 1900 . Click OK.

-
In Create Firewall Rules under Source IP>Specific IP type in the IP address of your same media device again
-
Make sure that Allow is selected in the Create Firewall Rules popup and then click OK.
-
REPEAT STEPS 15 THROUGH 34 FOR EACH MEDIA DEVICE.
-
When you’ve added all your media device rules, for If no rules are matched: select Deny Access.
-
Click OK again to save all the rules you added to LAN 2.
-
Below is an example of what the LAN 2 profile would look like if you set it up for 2 media devices. Your Source IPs, of course, will be different from this example.
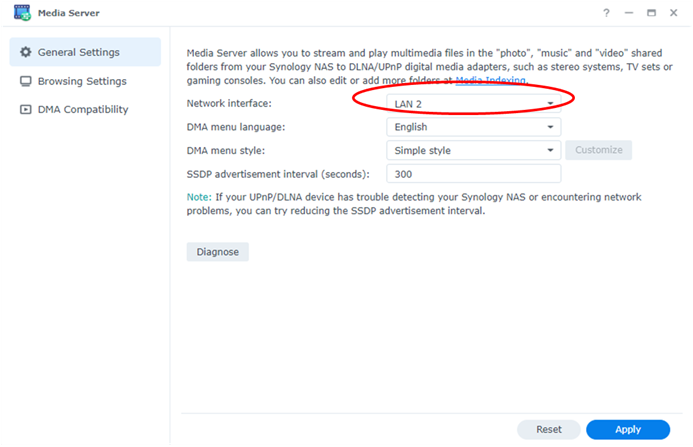
Part 3. Last, you need to reassign UPnP and DLNA services to LAN 2. By default it is set to LAN 1.
-
Open the Media Server package and in the General Settings tab click the dropdown box for Network Interface: and select LAN 2.
-
Click Apply.
You should be all set. Now you can play movies, listen to music and see your photos from your DiskStaion in one VLAN to your media player (Disc Player/TV/etc.) in another. Have fun! ![]()